¶ NOTES
I have tested another distro after the creation of this guide. All distros that are confirmed to work without further configuration will be listed below:
Debian 12 (bookworm)
¶ Prerequisites (Ubuntu Server)
¶ Fresh install of Ubuntu Server 22.04.4 LTS:
# escalates you to root user, will be an easier setup
# because you won't need to type sudo everytime
sudo su
apt update -y && apt upgrade -y
¶ Install docker on YOUR Distribution:
https://docs.docker.com/engine/install/
if you experience issues with this, follow the link above
curl https://get.docker.com | bash
From here on, everything should be the exact same if your on a debian based distribution.
¶ Portainer:
This part is optional but Portainer is a great tool for managing docker.
docker run -d -p 9443:9443 --name portainer --restart=always -v /var/run/docker.sock:/var/run/docker.sock -v portainer_data:/data portainer/portainer-ce:latest
Go to https://*serverip*:9443 in your browser and setup your local account.
It will say "Your connection is not private" because the SSL cert isn't signed by a trusted authority.
You can ignore it. Proceed.
¶ Using Docker Compose for Pterodactyl and Wings
This part is the fun part. The following docker compose file is clearly labeled and has simple explanations of what each line does.
¶ Making Directories
For this part we will need to make a few folders for docker to bind to.
mkdir -p /opt/pterodactyl/wings/config
mkdir -p /opt/pterodactyl/panel/appvar/
mkdir -p /opt/pterodactyl/panel/nginx/
mkdir -p /opt/pterodactyl/panel/logs/
¶ Install Docker Compose
Now we need to create a docker-compose.yml file at "/opt/pterodactyl" and install
docker compose.
apt install docker-compose -y
cd /opt/pterodactyl/
touch docker-compose.yml
¶ Making your docker-compose.yml
With your preferred text editor , write the following inside the docker-compose.yml file.
(vi, nano, etc.)
vi docker-compose.yml
# OR
nano docker-compose.yml
version: "3.8"
# This section declares the basic config of all of your Containers that are
# declared below as "services"
x-common:
  database:
    &db-environment
    # You don't need to change these because it will not be exposed to the public.
    MYSQL_PASSWORD: &db-password "CHANGE_ME"
    MYSQL_ROOT_PASSWORD: "CHANGE_ME_TOO"
  panel:
    &panel-environment
    #This is the URL that your panel will be on after being reverse proxied.
    # set this to "https://yoursubdomain.yourdomain.yourdomainstld"
    APP_URL: "https://subdomain.domain.tld"
    # A list of valid timezones can be found here:
    # http://php.net/manual/en/timezones.php
    APP_TIMEZONE: "America/New_York"
    APP_SERVICE_AUTHOR: "[email protected]"
  # Mail is an optional Setup, I have the basic setup if you want to use a gmail
  # account. You will need an App Password as the MAIL_PASSWORD field, not your
  # gmail password. Uncomment the following lines to enable mail.

  #mail:
    #&mail-environment
    #MAIL_FROM: "[email protected]"
    #MAIL_DRIVER: "smtp"
    #MAIL_HOST: "smtp.gmail.com"
    #MAIL_PORT: "587"
    #MAIL_USERNAME: "[email protected]"
    #MAIL_PASSWORD: ""
    #MAIL_ENCRYPTION: "true"
services:
  # Wings is the service that hooks into docker and actually creates your game
  # servers,
  wings:
    image: ghcr.io/pterodactyl/wings:latest
    restart: always
    networks:
      - ptero0
    # These are the ports exposed by Wings, I don't recommend changing them.
    ports:
      - "8443:443"
      - "2022:2022"
    tty: true
    environment:
      TZ: "America/New_York"
      # For ease of setup, this is going to use root user.
      WINGS_UID: 0
      WINGS_GID: 0
      WINGS_USERNAME: root
    # This is where docker will bind certain parts of container to your actual
    # host OS. These locations will be used later.
    volumes:
      - "/var/run/docker.sock:/var/run/docker.sock" # DO NOT CHANGE
      - "/var/lib/docker/containers:/var/lib/docker/containers" # DO NOT CHANGE
      - "/opt/pterodactyl/wings/config:/etc/pterodactyl" # Feel free to change.
      - "/var/lib/pterodactyl:/var/lib/pterodactyl" # DO NOT CHANGE
      - "/var/log/pterodactyl:/var/log/pterodactyl" # DO NOT CHANGE
      - "/tmp/pterodactyl/:/tmp/pterodactyl/" # Recommended not to change.
  # It's a database. Not much else to explain.
  database:
    image: mariadb:10.5
    restart: always
    command: --default-authentication-plugin=mysql_native_password
    volumes:
      - "/opt/pterodactyl/panel/database:/var/lib/mysql"
    environment:
      <<: *db-environment
      MYSQL_DATABASE: "panel"
      MYSQL_USER: "pterodactyl"
  # It's a CACHE database. Not much else to explain.
  cache:
    image: redis:alpine
    restart: always
  # Now the fun part. Your actual panel.
  panel:
    image: ghcr.io/pterodactyl/panel:latest
    restart: always
    # For NGINX Reverse Proxy, I will be using these ports for simplicity.
    ports:
      - "802:80"
      - "4432:443"
    # Links these containers together in a docker network.
    links:
      - database
      - cache
    # This is where docker will bind certain parts of container to your actual
    # host OS. These don't really matter that much.
    volumes:
      - "/opt/pterodactyl/panel/appvar/:/app/var/"
      - "/opt/pterodactyl/panel/nginx/:/etc/nginx/http.d/"
      - "/opt/pterodactyl/panel/logs/:/app/storage/logs"
    # Sets the config stuff
    environment:
      <<: [*panel-environment]
      # <<: [*mail-environment]
      DB_PASSWORD: *db-password
      APP_ENV: "production"
      APP_ENVIRONMENT_ONLY: "false"
      CACHE_DRIVER: "redis"
      SESSION_DRIVER: "redis"
      QUEUE_DRIVER: "redis"
      REDIS_HOST: "cache"
      DB_HOST: "database"
      DB_PORT: "3306"
# This is Wings' Network. We don't need much depth here, all you need to know, is
# that it allows the passthrough of the ports from Wings.
networks:
  ptero0:
    name: ptero0
    driver: bridge
    ipam:
      config:
        - subnet: "192.55.0.0/16"
    driver_opts:
      com.docker.network.bridge.name: ptero0
Save and Run:
docker-compose up
This should begin setting up your containers, be patient and wait for them to finish installing.
¶ A Good Error to Get
If you are getting only errors like this, PERFECT! That is supposed to happen:
wings_1     |
wings_1     | Error: Configuration File Not Found
wings_1     |
wings_1     | Wings was not able to locate your configuration file, and therefore is not
wings_1     | able to complete its boot process. Please ensure you have copied your instance
wings_1     | configuration file into the default location below.
wings_1     |
wings_1     | Default Location: /etc/pterodactyl/config.yml
wings_1     |
wings_1     | This is not a bug with this software. Please do not make a bug report
wings_1     | for this issue, it will be closed.
wings_1     |
wings_1     | pterodactyl_wings_1 exited with code 1
Press CTRL + C to gracefully stop the containers (temporarily).
Now start all your containers but NOT wings, with either
docker container start *container name*
or using Portainer.
You should be able to go to http://*serverip*:802 in your browser now and be greeted with the Pterodactyl login screen!
Before we continue, Lets setup our reverse proxy for our Panel.
¶ NGINX configuration for your Panel
Before we start, Make sure you have an A or CNAME record made for the subdomain you chose. Also make sure that the server running NGINX has access to the ports of the server running the panel. (you don't have to worry if you are only using one server)
Go to your NGINX config (nginx.conf, sites-enabled/)
if you have a "sites-enabled" folder make a new file and name it anything you want, but I will be making mine "pterodactyl.conf". You can also add the following text to your nginx.conf file.
(I am not using one pc, so i will put the servers ip)
server {
    # put ssl config here
    listen 443 ssl;
    server_name yousubdomain.yourdomain.yourdomainstld;
    location / {
        proxy_set_header X-Real-IP $remote_addr;
        proxy_http_version 1.1;
        proxy_set_header X-Forwarded-For $proxy_add_x_forwarded_for;
        proxy_set_header Host $http_host;
        proxy_set_header Connection "Upgrade";
        proxy_set_header Upgrade $http_upgrade;
        proxy_set_header X-Nginx-Proxy true;
        proxy_set_header X-Forwarded-Proto $scheme;
        # set serverip to 127.0.0.1 if you are only using one server.
        proxy_pass http://*serverip*:802;
    }
}
Now run a config test with nginx and restart it.
nginx -t
nginx -s reload
Now you should be able to go to https://yousubdomain.yourdomain.yourdomainstld in your browser!
But if you noticed, there is no users to login as. Now we need to make one.
¶ Creating users (terminal)
To create a user, we have to go inside the container, kinda.
The following command runs a command inside the container to make a user.
docker exec -it pterodactyl_panel_1 php artisan p:user:make
Go through setting up your user.
The final output should be similar to:
+----------+--------------------------------------+
| Field    | Value                                |
+----------+--------------------------------------+
| UUID     | aaaaaaaaaaaaaaaaaaaaaaaaaaaaaaaaaaaa |
| Email    | [email protected]                              |
| Username | a                                    |
| Name     | a a                                  |
| Admin    | Yes                                  |
+----------+--------------------------------------+
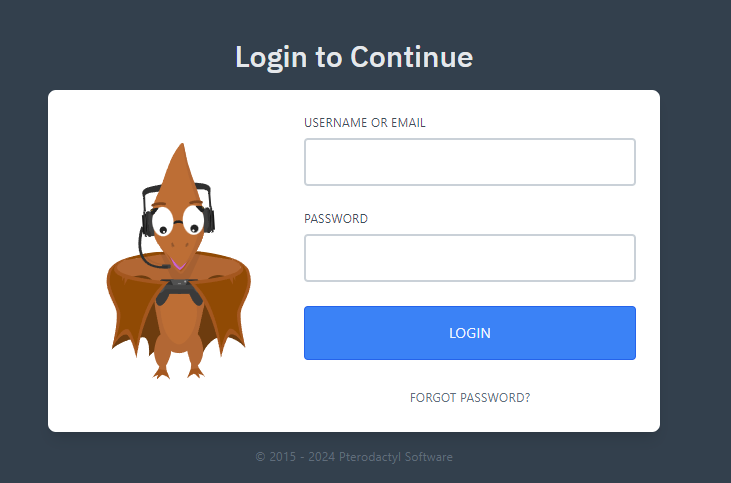
Now login to your panel with those credentials.
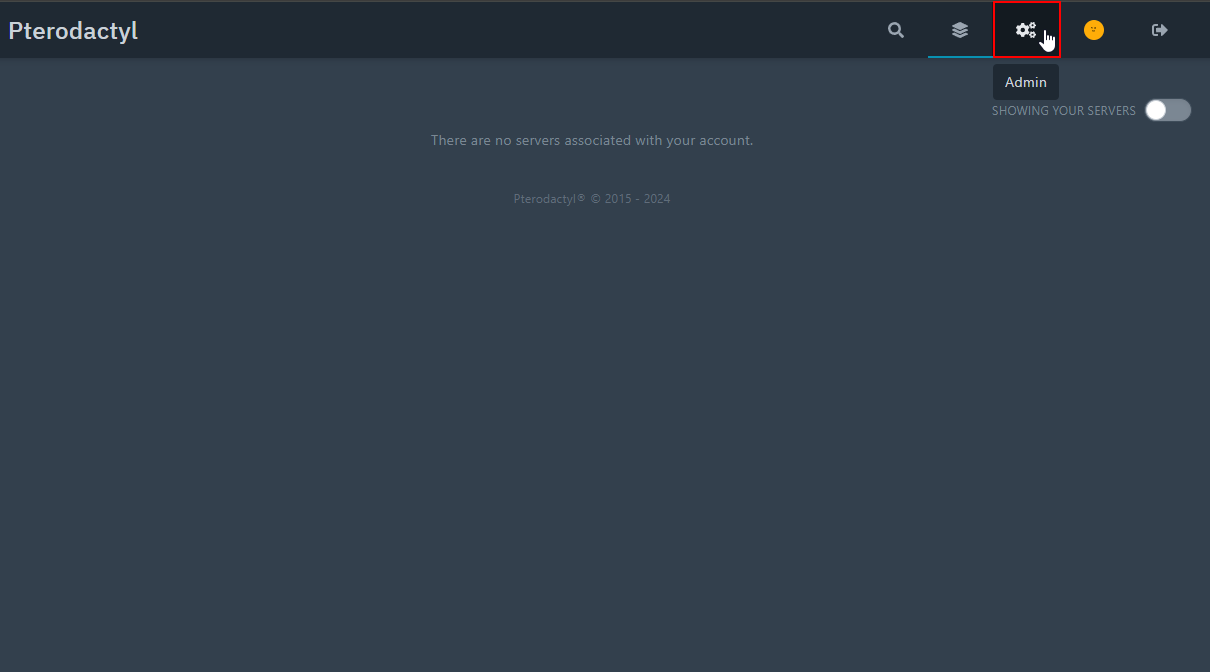
¶ Step by Step Node Setup
This part can't really be only done in text and will have images to guide.
- When you are on the home page, click the administration button
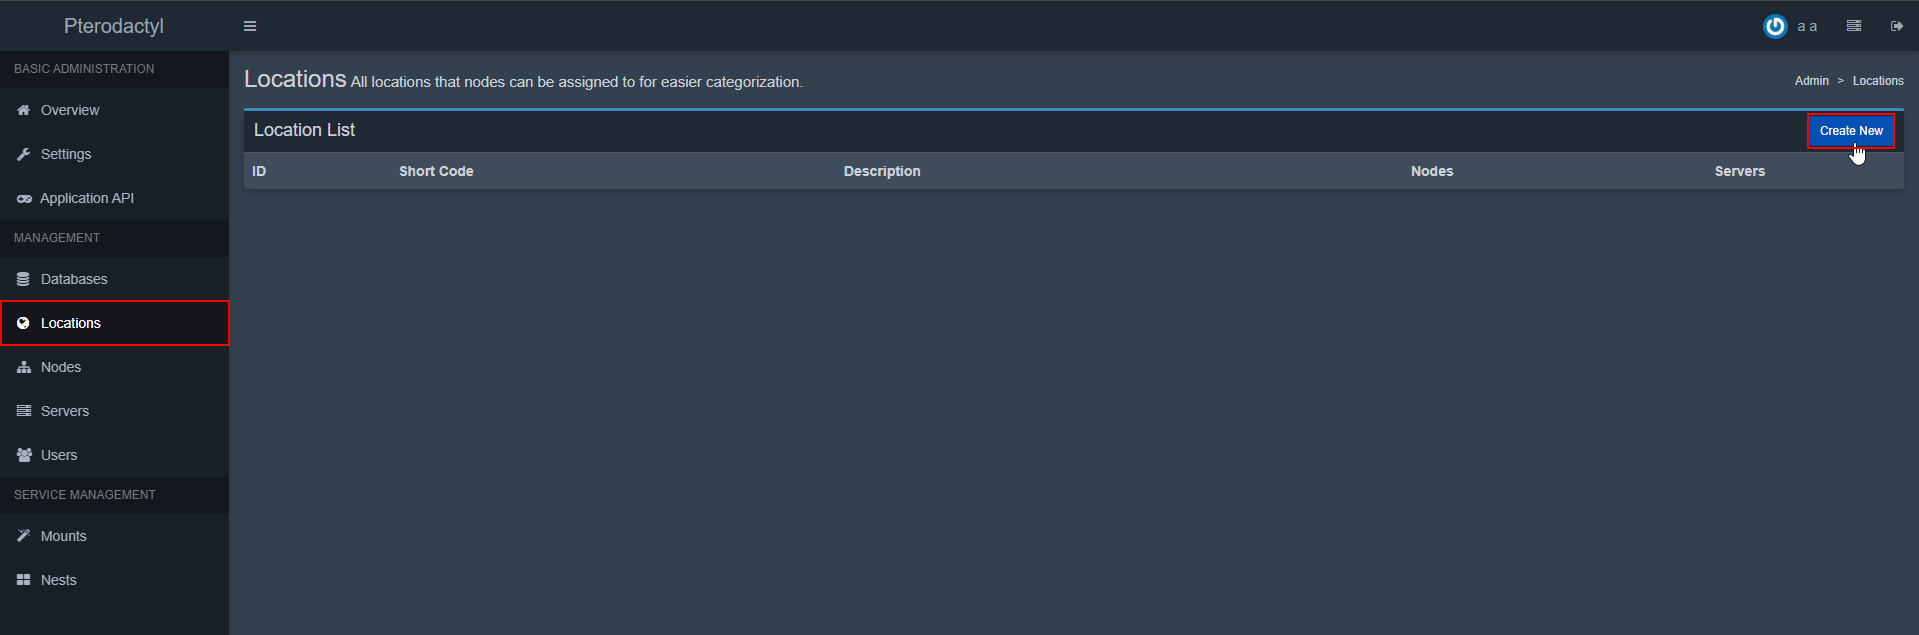
- Now when you are there, click locations, then click "Create new"
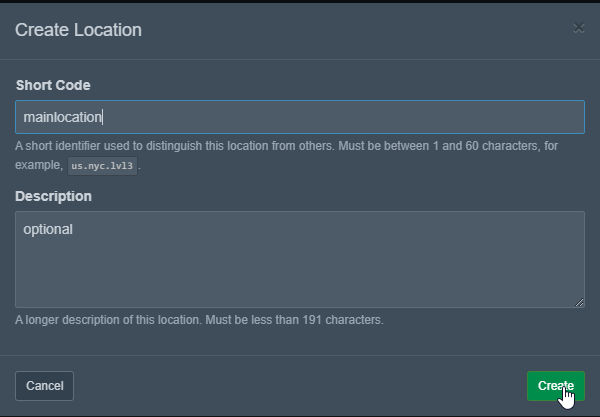
- A dialogue should appear and just fill it out however you want.
- Now click Nodes and Create New

- Fill out details about your node such as how much memory and disk it is allowed to use, and make sure all fields outlined in red in the image are the EXACT same. Then click Create Node
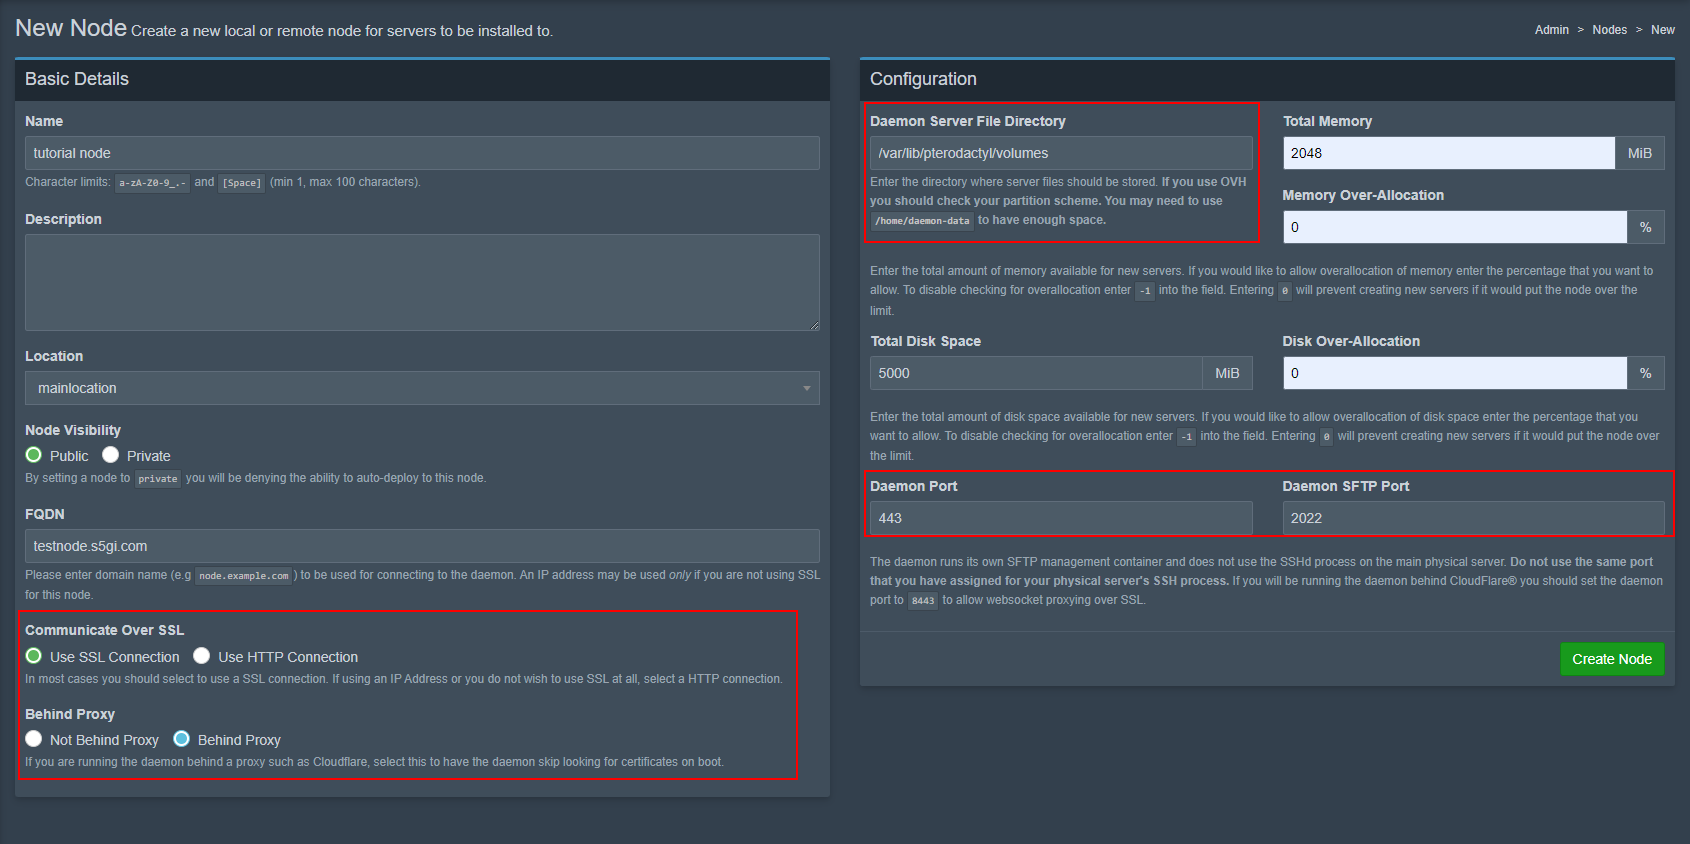
- Now click on the configuration tab and copy the config.
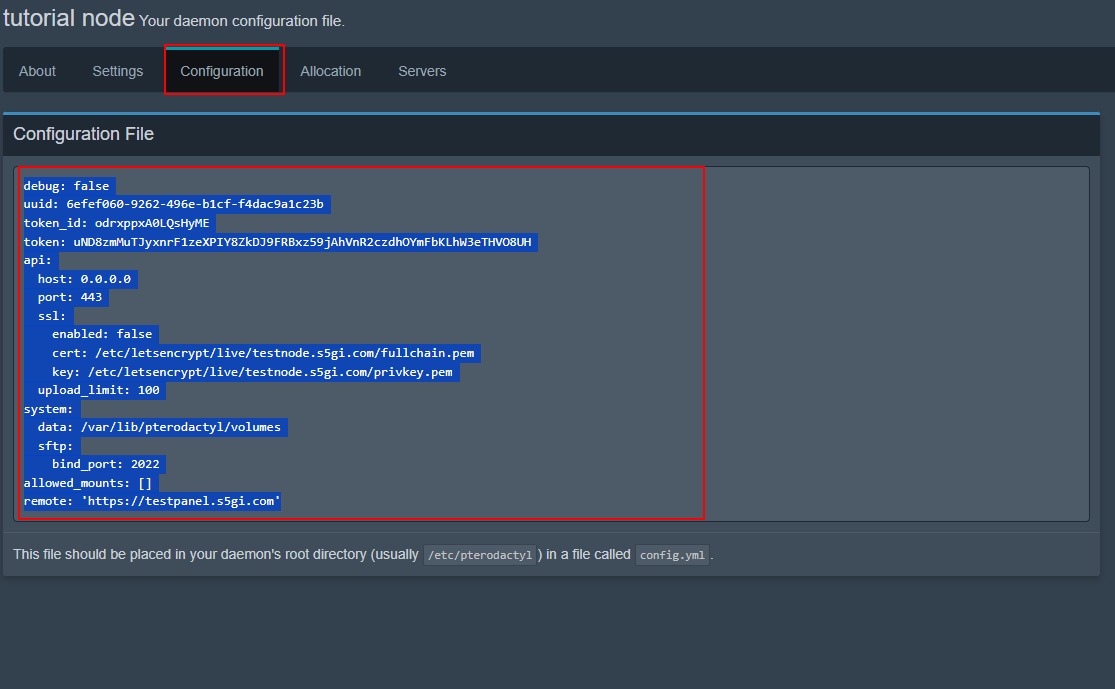
- Go to your console once more and go to
/opt/pterodactyl/wings/configor anywhere else if you changed it. And make a file calledconfig.yml. Then paste the copied config in that file.
cd /opt/pterodactyl/wings/config
touch config.yml

vi config.yml
# OR
nano config.yml
- You now need to start Wings, either via Portainer or CLI
docker container start pterodactyl_wings_1
- If you get an error like:
FATAL: [Apr 23 16:03:33.350] failed to configure docker environment error=Error response from daemon: Pool overlaps with other one on this address space
Try adding this to the end of yourconfig.ymlfile:
docker:
  network:
    interfaces:
      v4:
        subnet: 192.54.0.0/16
        gateway: 192.54.0.1
- If you no longer get the error, continue on, if you get another one, go to my discord and i can try and help.
- We now have to reverse proxy your Wings instance through nginx in order for your node to show up in pterodactyl. Start by going back to that file we made for your panel in the /etc/nginx directory.
- Add the following to the file:
server {
    # put ssl config here
    listen 443 ssl;
    http3 on;
    server_name node1.yourdomain.yourdomainstld;

    location ~ ^\/api\/servers\/(?<serverid>.*)?\/ws$ {
        # set serverip to 127.0.0.1 if you are only using one server.
        proxy_pass http://*serverip*:8443/api/servers/$serverid/ws;
        proxy_http_version 1.1;
        proxy_set_header Upgrade $http_upgrade;
        proxy_set_header Connection "upgrade";
        proxy_set_header Host $host;
        client_max_body_size 50m;
        proxy_set_header X-Forwarded-For $proxy_add_x_forwarded_for;
        proxy_set_header X-Real-IP $remote_addr;
        proxy_set_header X-Forwarded-Proto $scheme;
        proxy_redirect off;
        proxy_buffering off;
        proxy_request_buffering off;
    }

    location / {
        # set serverip to 127.0.0.1 if you are only using one server.
        proxy_pass http://*serverip*:8443/;
        proxy_set_header Host $host;
        client_max_body_size 50m;
        proxy_set_header X-Forwarded-For $proxy_add_x_forwarded_for;
        proxy_set_header X-Real-IP $remote_addr;
        proxy_set_header X-Forwarded-Proto $scheme;
        proxy_redirect off;
        proxy_buffering off;
        proxy_request_buffering off;
    }
}
- Now run a config test with nginx and restart it.
nginx -t
nginx -s reload
- You should now be able to return to your pterodactyl panel and see that your node has a green pulsing heart next to it. Great! You are all setup. The Pterodactyl docs can take it from here if you need further help in this guide. The Youtube video I made with this guide will have footage of me making server and allocations.!
